Prepare
Survive
Recover
Know Your Risk
Resources
News & Events
About the Alliance
ECA Regions
ECA Southern California
ECA Central Coast
ECA Bay Area
Redwood Coast
Languages
Español
More Languages
Contact Us
Search Page
Home
ECA Regions & Committees
ECA Southern California
ECA Central Coast
ECA Bay Area
Redwood Coast
ECA Sector-Based Committees
Languages
Español
More Languages
Contact Us
Search Page
Prepare
Secure Your Space
Plan to Be Safe
Organize Disaster Supplies
Minimize Financial Hardship
Survive
Drop, Cover, and Hold On
Improve Safety
Recover
Reconnect and Restore
Know Your Risk
Resources
News & Events
The Alliance
The Seven Steps
- PREPARE -
Step 1: Secure Your Space
Water Heater
Kitchen Cabinets
Kitchen Food Safety
Refrigerators
Bookcases
Filing Cabinets
Electronics
Small Objects
Shelving Units
Hanging Objects
Floor-Mounted Objects
Wheel-Mounted Furniture
Vending Machines
Lockers and Storage Cabinets
Chemicals
Gas Cylinders
Propane Tanks
Glass
Closed Shelves
Open Shelves
Display Cases
Gas Safety
Shop/Gym Equipment
Full Wall Partitions
Masonry Partitions
Modular Partitions
Equipment Racks
Access Floors
Emergency Power System
HVAC Units
Ducts
Filtration Tanks
Suspended Ceilings
Ceiling-Mounted Lights and Ventilation Grills
Pendant Mounted Lights
Wiring
Emergency Batteries
Cable Trays
Fixed Anchorage
High Friction Skids
Motion Isolators
Exit Doors
Rooftop Heating
Rooftop Mechanical Units
Space Heaters
Suspended AC Units
Piping
Large Windows
Step 2: Plan to Be Safe
Step 3: Organize Disaster Supplies
Step 4: Minimize Financial Hardship
- SURVIVE -
Step 5: Drop, Cover, and Hold On
Step 6: Improve Safety
- RECOVER -
Step 7: Reconnect and Recover
Go!
Prepare
Step 1: Secure Your Space
Tall Furniture
Televisions
Hanging Objects
Small Objects
Refrigerators
Cabinet Doors
Storage Racks
Water Heater
— OTHER ITEMS —
Kitchen Food Safety
Filing Cabinets
Shelving Units
Floor-Mounted Objects
Wheel-Mounted Furniture
Vending Machines
Lockers and Storage Cabinets
Chemicals
Gas Cylinders
Propane Tanks
Glass
Closed Shelves
Open Shelves
Display Cases
Gas Safety
Shop/Gym Equipment
Full Wall Partitions
Masonry Partitions
Modular Partitions
Equipment Racks
Access Floors
Emergency Power System
HVAC Units
Ducts
Filtration Tanks
Suspended Ceilings
Ceiling-Mounted Lights and Ventilation Grills
Pendant Mounted Lights
Wiring
Emergency Batteries
Cable Trays
Fixed Anchorage
High Friction Skids
Motion Isolators
Exit Doors
Rooftop Heating
Rooftop Mechanical Units
Space Heaters
Suspended AC Units
Piping
Large Windows
Step 2: Plan to Be Safe
Step 3: Organize Emergency Supplies
Step 4: Minimize Financial Hardship
Home Not Bolted to Foundation
Cripple Walls
Post and Pier Foundation
Unreinforced Masonry Foundations
Unreinforced Masonry Chimneys
Unreinforced Masonry Walls
Secure Concrete or Masonry Walls to Roof or Floor
Steep Slopes
Parapets and Cornices
Rooms Over Garages
Mobile Homes
Soft Stories
Chimneys
Homes with Unique Designs
Other Foundation Issues
Survive
Step 5: Drop, Cover, and Hold On
Step 6: Improve Safety
Recover
Step 7: Reconnect and Restore
Cable Trays
Purpose
To secure cable trays.
Recommendation
Strengthen existing supports with angles that are welded and braced.
Supplies Required
Angle—1-1/2″ x 1-1/2″ x 1/4″
Sheet metal screws—No. 10 x 3/4″
Installation
Brace cable tray with angles in two directions, installed diagonally at every other or alternate sides.
Weld angles to the supports or screw the top and bottom of the angles to the support with sheet metal screws.
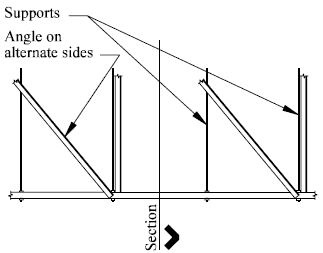
Side View of Cable Tray with Screws and Attached Braces
Source: Noson, Perbix, SSD
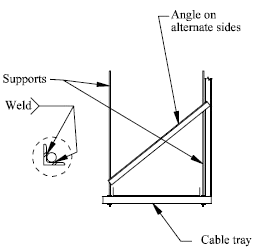
Section Through Cable Tray with Welded Brace
Source: Noson, Perbix, SSD